Students in Maths 1M are learning the cross product at the moment. This is a way to multiply two vectors in 3D space — let’s call them v1 and v2 — to produce a new vector, which is called v1 × v2. The length of this new vector is related to the lengths of the two original vectors and the angle between them, and the direction is perpendicular to both of the original vectors. However there are two possible directions it could point and still be perpendicular to both. We need a consistent way to choose which of the two options to use, and this is provided by the so-called “right-hand rule”.
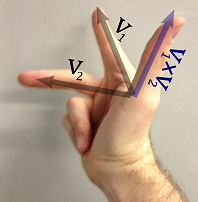 I was taught the right-hand rule as per the picture here: you extend your thumb and forefinger as far as they go, and then stick out your middle finger. Then arrange it so your index finger points in the direction of v1 and your middle finger points in the direction of v2 . Then your thumb must point in the direction of v1 × v2. I have very strong memories of looking around in my first-year Physics exam to see people in various contortions as they used the rule.
It’s a cute little rule and does the job well, but in fact it is not the only correct version of the right-hand rule. Often it is taught as if it’s the only possible way to do it, but to be honest it’s just a mnemonic so some other version is actually ok! Especially if you happen to find the other version easier to use and remember. I thought I’d put the various versions I know here to compare the alternatives.
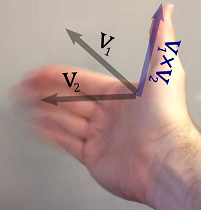
 First, let’s look at a very slightly modified version of the original three-finger version. I don’t know about you, but it tends to hurt my hand to have the middle finger out but the other two curled under (it reminds me of the pain of trying to do the Vulcan salute too often). So I like to do the version shown on the right, where I point all three of the other fingers outwards. It’s not really different from the first version, but it sure is less painful!
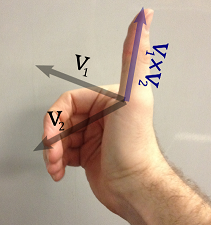
 The next version is pictured here on the left. The fingers are in the same arrangement, but different fingers relate to different vectors. In this alternative version, the thumb is v1, the index finger is v2, and the other fingers are v1 × v2. Personally I find this one easier to use and more realistic because you can move your thumb to indicate smaller and bigger angles between v1 and v2. Other people like the first version because they think of their index finger as their first finger and so it makes sense to them for it to be the first vector.
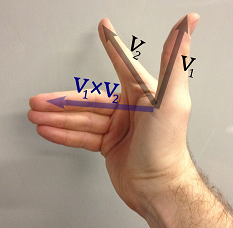
 From this alternate version, we can ease the strain on our hand just a little more by realising that we don’t technically need the other three fingers to point outwards because our palm always faces that way anyway. So here is the “palm” version of the right-hand rule on the right: your thumb is v1, your fingers are v2, and v1 × v2 points out of your palm. This is my favourite, and not just because it’s the easiest to actually manipulate your fingers into shape! It gives to me a real sense that v1 and v2 are creating a plane and the cross product is pointing out of it.
 Even though the palm version is my favourite, there are two more versions I know about, so I’ll mention them too. The first I call the “sweep” version and it’s pictured on the left: you orient your four fingers towards v1, and then you sweep your fingers towards v2. If you do this, then your thumb will point in the direction of v1 × v2. There is something about the dynamic nature of this version that I do like — you really get the feel that the cross product is actually doing something to the two vectors because you’re moving your fingers. It does however take a greater leap of imagination than the others.
 The final version I call the “curl” version and it’s shown on the right. It has the same idea as the sweep version, but you basically represent the sweep statically. You imagine v1 and v2 in a plane and you curl your fingers to represent the direction you need to rotate to go from v1 to v2. Then your thumb will point in the direction of v1 × v2 . This one requires a lot of imagination again, but it does have an advantage that it is the same arrangment of your fingers that you use in Physics to find the direction of a torque or the direction of a magnetic field based on a flowing current. Interestingly, this is one of the most common to find by searching on the internet, and is the one described on Wolfram MathWorld.
So there you go: that’s six versions of “the” right hand rule. Whichever of them makes most sense to you and causes least pain is fine for you to use — you can even make up your own if you like! But do remember other people may use different ones so take care when communicating with others to tell them how your version works!