This is the fourth in a series of blog posts about a Maths Day I did in a Year 7 classroom. So far I’ve discussed
- how awesome the day was
- how I implemented Quarter the Cross
- the unexpected things that happened with Zero Zeros.
In this post, I’ll be talking about the activity we did in the recess-to-lunch period. The focus of this period was a group of puzzles I like to call Spotless Dice. I have written about them before, and I really thought they had a great opportunity for maths that was about reasoning rather than numbers per se. Plus I invented the puzzle, so it was a certain pleasure to give it a go in a real classroom! Just like with my analysis of the Quarter the Cross implementation, I’ll talk through the different parts of the activity.
Making dice
For what was to come afterwards, I wanted the students to have a physical die to look at. Now the classroom had a set of dice already, but I wanted to make sure the dice they had were arranged the same way as the puzzle. Plus I wanted to make sure that everyone understood how the net for a die that would be shown in the puzzle corresponded to a physical die.
A long time ago, I created a template for a die which tends to hold together without glue, based on my favourite net for a cube. You fold away from you along all the lines and then tuck in the tabs so that they sit flat on the inside of each face:
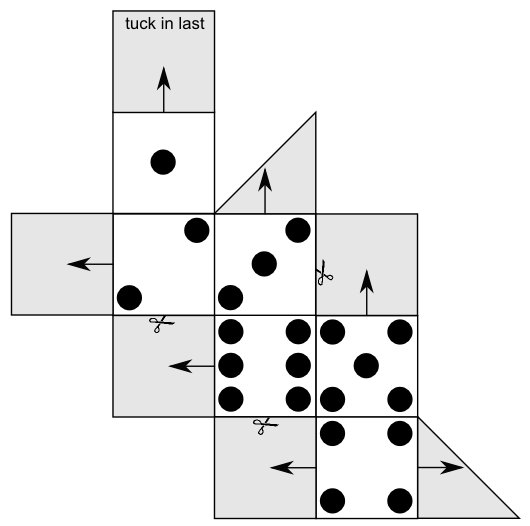
I didn’t choose to use this template, because the puzzles I would be using have the faces arranged in the traditional cross-shape and I wanted the template for building the die to match. I could have changed the puzzles to be in the zigzag shape too, but then it would not be nearly so obvious which face was opposite which, and this is important to solving the puzzles. So I created a different template which would still hold together pretty well without glue, but was based on the traditional cross. (Even so, I couldn’t resist putting the above one in the post here because, well, it’s awesome, if I do say so myself.) Anyway, this is the template I ended up using:
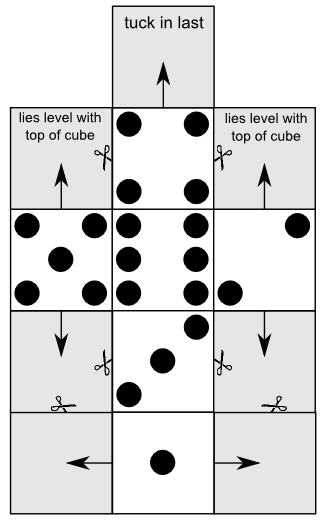
One advantage of this template is that I could easily fit several of them onto one sheet of paper — much more easily than the zigzag template! Investigating with different thicknesses of paper, it turned out this template fits together much more easily if you just use ordinary 80gsm printing paper, which is very convenient for standard classroom use!
Anyway, I gave them these dice to make once they had finished the Quarter the Cross display copy (along with the Zero Zeros puzzle to do once they finished their dice). It turned out to be quite difficult for many students to figure out how to physically manipulate it to put it together. I took to carrying a copy with me and showing them how I did it on mine so that they could copy me. A couple of students did it very quickly and I had to do some damage control when they kept saying “but it’s easy!”. One simple thing I could do next time would be simply to print the dice bigger. I did them eight to a page and some of the students just weren’t dexterous enough with the fiddly little bits. Printing four to a page might have been more successful.
The first puzzle
Once most of the students had a completed die, we called them to come and sit in a group at the front of the classroom. (In hindsight I should have asked them to bring their dice with them at this point because that caused some problems later on. Ah well.)
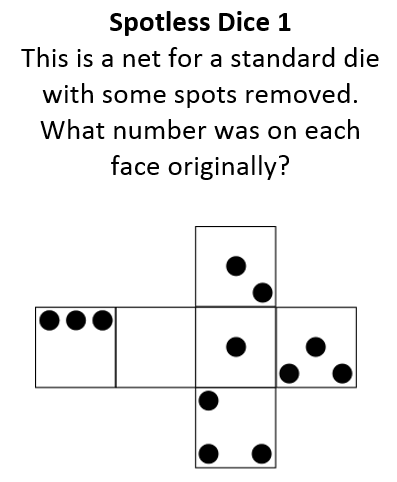
I showed them the first Spotless Dice puzzle on the screen and asked them to think for a minute silently about it without talking to anyone. Here it is:
When I said we were ready to talk about it, a whole lot of hands shot up, but I wanted to make sure everyone got a chance to say something. The teacher, Anne, passed me a cup full of popsticks with the students’ names on them saying that’s how she usually deals with that. So I mixed up the popsticks and pulled them out one at a time to choose who to call upon. (Hilariously, the first seven or so I pulled out were either absent that day, or over with their buddy Year 1 class.)
The first student I simply asked if he noticed anything, but later students I asked if they knew what one of the faces had to be, followed up with how they could be sure. I spent a lot of time rephrasing what they said and asking if that was what they meant. It wasn’t long before we needed to organise our thinking, so a student jumped up to the whiteboard and started drawing the net so she could fill in the numbers we already knew. With this extra information, the students started to say things like, “Well it could be the five, but we already have the five, so it must be the four.” And so we completed the puzzle.
It is worth pointing out that this puzzle only requires you to know what position the dots are in on each face of the die separately. It’s not necessary to know anything else about the die to do this puzzle, which is why I chose to do it first — it was a useful introduction to the sort of reasoning involved, without complicating it with prior knowledge about standard dice.
The second puzzle
And so we moved on to the second puzzle, which looks like this:

I did the same thing as last time and asked them to think for a bit silently before I would call upon them to give input. The first student noticed that there were three the same, but they had to be the four, five and six because they had four dots. The next couple of students figured out where the one, two and three had to be. The next students declared that the six could be in the middle of the cross, and I asked if they could know for sure. There was a pleasantly puzzled silence.
At this point I said there must be some information about a standard die that would be useful to finish the puzzle. I asked them to get the dice they had made and look at them to see if there was something they noticed that might help. (This is where I realised I should have asked them to bring the dice with them!) Without even going to get her die, one student’s hand shot up. I quietly asked her if she knew something useful about dice, and she vigorously nodded. I whispered to her that I wanted everyone else to figure it out for themselves, if that was ok.
By now, some students had noticed some things, so I asked them what it was. “The six is always opposite the one.” I asked everyone else to check their die to see if that was true, and it was. So now we could tell where the six was. Several students took up the chase and noticed the three was opposite the four and the two was opposite the five. This allowed us to finish our puzzle. I asked them if there was a single rule that told you which face was opposite which face. Most weren’t sure, so I let the student I whispered to before reveal her prior knowledge. She duly told us that the opposite faces add to seven. Several students looked at their die to check this.
This was precisely how I hoped this part of the lesson would go. I carefully designed the two puzzles so that one didn’t require the knowledge that opposite faces add to 7, and the second did. This second one was designed so that you could find three of the faces, but then the other three needed you to know which face was opposite which. My hope was that I could lead in to the logical thought required before introducing the second level, and that I could cause a reason to look at the arrangement of the die. And it worked! I was so happy!
Before we moved on to the next part of the activity, I asked one more question: “How many dots did we remove here?” The students added up how many I had removed from each face, to get a total of six. Then I asked, “How could you tell how many dots were removed without actually finding out which face was which?” A couple of students came up with the idea that if you added up the numbers one to six, that would be 21, and you could just count how many dots were there and see how far from 21 it was. I said it was interesting how you could know the answer to that question without actually figuring out what was on each face. (I wasn’t going anywhere with this in particular, I just noticed an opportunity to make a general point about problem-solving.)
Making our own puzzles
Now that we had set up the sort of thinking required, I wanted them to have a go by making puzzles of their own. My vision was to have them working in groups and then the groups would give their puzzles to other groups to do. I gave everyone a couple of templates like this:

Anne helped to create the groups (though some students chose to work alone), and what ensued was only barely contained chaos. Oh, a heap of great stuff was happening everywhere, it was just a bit out of control! In hindsight it might have been better to make pairs and singles, and then join them together into groups of five or six, and to pass the puzzles they made just within those groups, rather than allow them to pass them to any other group in the whole room. You live and learn.
Anyway, the learning that was happening was successful. The students were so engaged in the process of making their own puzzles, and it really gave them an opportunity to understand how the reasoning process worked. Students would test their problems on other students or on us, and would discover that we couldn’t tell for sure which face was which. They realised they were basing their puzzle’s solution on their own memory of what was where, rather than whether a newcomer could figure it out from the information they had. Then they’d have to go back and think about the logic a bit more carefully and perhaps add another spot back in.
A couple of students had their puzzles completed, and so I asked them if they could figure out how many spots they could remove and still be able to figure it out. One boy worked on this diligently for a very long time, even into the lunch break, and he’d come back every minute or so showing how he’d been able to remove one more spot. In the end he got it down to six spots left. I didn’t reveal to him how many you can remove, because I wanted him to have his success to himself.
Finishing off
Lunch suddenly arrived unexpectedly because they were all so engaged. Anne asked them to stick everything they’d been doing into their maths books before they went out to lunch. In the end, we didn’t get to round off this activity into a nice little moral. At the very least I would have liked to get the students to write a reflection on what they had learned.
One thing I would have liked to talk more with them about was the logical constructions they were using when they talked about solving the puzzles. I saw so many students doing mini proofs by contradiction, involving constructions of “If …, then ….. But …, so …”. If I had another lesson perhaps on another day, I would have gotten students to write down their reasoning in words for various puzzles and put them up on the board to compare similar and different reasoning and similar and different wordings. I think this could really be an awesome introduction to the concept of a proof.
Final thoughts
All in all, I was very proud of what I achieved here. The first puzzle was an excellent lead-in to the logical ideas involved, and also allowed some students to engage in the later part without having to worry about the more complex idea of the opposite faces adding to seven. The second puzzle, even for these students, gave them a reason to look closely at the complete dice in order to notice the extra structure and was much better than just telling them this fact. Finally, getting them to make and test their own puzzles got them to really think about how the logic actually worked. Plus they got to have something they made themselves. All in all, it was way more successful than I hoped it could be.
PS: Here are the rest of the posts in the series:
- How I felt about the day
- Quarter the Cross
- Zero Zeros
- Spotless Dice
- Mathematical art appreciation
- Hotel Infinity
- Thanks for coming
Love this activity. A great opportunity for students to think, reason, explicitly explain their idea using mathematical language and to support each other to achieve success. Teaching students to be risk takers through reasoning and problem solving is important and it sounds like all the students left that lesson feeling like competent, capable learners. 🙂
[…] Spotless Dice […]
[…] UPDATE: Discussion on how I used this in a classroom, and some improved starting versions of the puzzle are at a later blog post A Day of Maths 4: Spotless Dice […]